 If you haven't already picked up on it, I try to be healthy. My friends might consider that an understatement. "Health nut" sums it up pretty well. I can border on obsessive when it comes to healthy eating (with all that information on the web, how can it not make anyone paranoid?), which doesn't always go hand in hand with pastries, sadly. I think that's partially why I like to bake for other people rather than myself. I can use all that butter and sugar and other good stuff freely--not because I don't care about their well-being, of course(!), and I do believe there is the right time to let those cares go and really savor food, whether it's "good" for me or not. But when it comes to baking or cooking something only for myself, I can endure the cardboard taste simply because I tell myself it's good for me. Once in a while, though, I come across something that just might be able to be shared with non-health-nuts and health-nuts alike.
 Every so often, I go through an oatmeal phase. It kind of warms me up from the inside, especially useful for these cold days. And since last week, I've been contemplating, mulling over, engrossing myself with oatmeal. A bowl of hot oatmeal is wonderful in its simplicity, but oatmeal in cookies, in cake, or as a muffin provides a different indulgence. Oatmeal is the kind of food that makes you feel good about yourself. Eat an oatmeal raisin cookie, and I feel like I'm getting my daily intake of dietary fiber. Add it to chocolate chip cookies, and suddenly I'm convinced they're good for me. Yes, this is all self-deception, but oatmeal always makes me feel like home. So you can put away your bowl and lay aside your spoon, you're not going to need them for this oatmeal recipe.
This recipe originally came from allrecipes.com. What I appreciate about allrecipes.com and other sites like it is that they're usually recipes from people like me--not professionals, just people who have a love for cooking or baking. Of course, it's sometimes hard to tell whether it'll turn out or not--not all the recipes are great, but you do find a gem once in a while. Looking at the recipe initially, it certainly looked healthy, but I wasn't sure if there would be enough flavor or if it would come out dense and dry. Regardless, I was still convinced it had potential. With some tweaking, it turned out pretty nice, dare I say even fool-proof--and maybe good enough for the non-health-nuts out there.
 Honey Oatmeal Cake
Adapted from allrecipes.com
Makes one 8" round cake or 12 muffins
1 cup rolled oats
1 cup low fat buttermilk (or milk if you prefer)
1/2 cup vegetable or canola oil
1 large egg
1/2 t. vanilla
2/3 cup honey
Dry ingredients:
1/2 cup all purpose flour
1/2 cup whole wheat flour
1 t. baking powder
1 t. baking soda
1/2 t. salt
1 t. cinnamon
Soak the oats in buttermilk for about thirty minutes in a mixing bowl.
Preheat the oven to 350F degrees. Grease a cake pan or cupcake tin.
Add the oil, egg, vanilla and honey to the oats and mix on low until combined. Scrape the sides down, then continue mixing, adding the dry ingredients (no need to sift or whisk beforehand!). Pour the batter into the cake pan or distribute the batter evenly among the cupcake wells.
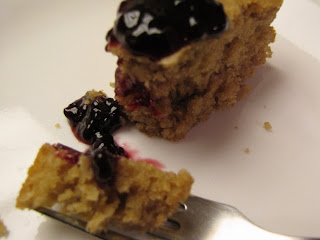
Bake for about 30 minutes, if using a cake pan, or 20 to 25 minutes if a cupcake pan, or until a toothpick comes out clean. Cool in the pan for about 5 minutes. You can serve it warm with preserves or any time by itself.

 I just finished baking some disastrous muffins. I guess that's a little extreme, how about very unsatisfying? I attempted to create something of my own instead of following someone else's recipe. I had extra buttermilk and chocolate chips, and I was kind of in the mood for something heartier and healthier like oatmeal, so I thought I'd mix the flavors and make "chocolate oatmeal buttermilk muffins". Now that I write it out, it doesn't sound as appealing as I thought it would. While they smelled wonderful out of the oven, they were almost too tangy and sank a little in the middle. At least they weren't dense and are still edible, but I didn't feel like they were worth sharing about (or taking pictures of). I'll stick with other people's recipes for now. So instead of writing to you about the muffins tonight, I'm going to resurrect a thumb-print cookie I mentioned before and made back in December, which I thought came out delectable!
 I decided on this recipe for this post also partially because the cookies look a little like buttons to me and on Saturday night, some friends and I celebrated a birthday by finally watching "The Curious Case of Benjamin Button". (Okay, maybe a little bit of a stretch with the whole button connection thing.) It was a great movie that prompted me to think about life and relationships (though it wasn't quite as amazing as I expected or hoped for based on what other people said, but I'd still recommend it, if you haven't seen it). The movie did have a fascinating concept (I discovered at the end of the movie that it was based on a short story by F. Scott Fitzgerald) and was beautifully made; and one of the lines that stuck out in my mind was Mrs. Maple's response when Benjamin, in his early years still looking like an elderly, asked the question of why people die (or maybe it was why we lose people we love, I can't remember exactly). She explained that we're meant to lose the people we love, otherwise we wouldn't know how much they mean to us. How sad to think how true that can be, and it made me hope that I would appreciate how much people mean to me before I lose them.
But anyway, I don't mean to bring you down with that! The original recipe for these cookies is from the December issue of Martha Stewart's Living, and instead of making a key lime filling, as the magazine suggests, I used apricot jam, which did the job perfectly--and quickly. The buttery cookie itself melts in your mouth, while the jam lends a counterbalancing sweet chewiness. My version did come out quite smaller (and much less perfect) than those in the magazine. Nonetheless, they were still cute as...(wait for it) a button (sorry).
 Thumbprint (button) Cookies
Adapted from Martha Stewart's Living
Makes about 80 one inch cookies
Cookie dough ingredients:
2-1/2 cups all purpose flour
1 t. salt
1 cup (2 sticks) of butter, softened
1/2 cup white granulated sugar
2 large yolks
1 t. vanilla extract
Cookie filling:
1/2 cup of your favorite jam
Powdered sugar for dusting (optional)
Cream the butter with sugar using a mixer on low to medium speed until the butter is fluffy and light. Continue beating, adding the vanilla and egg yolks. Once combined, mix in the flour and salt on low. Cover the bowl and refrigerate for about an hour (the dough can be refrigerated overnight).
When ready to bake, preheat the oven to 325F degrees and line baking pans with parchment paper. Roll the dough into 3/4" balls (about a heaping teaspoon). Using the handle of a wooden spoon or something similar, make indentations in the center of the balls. Spoon jam into the centers. Using the center to upper third racks of the oven and rotating baking sheets midway through, bake for about 12 minutes or until the cookies brown very slightly on the edges. Transfer cookies to cool on a wire rack, and dust powdered sugar over them (I liked the cookies without the powdered sugar as well).

 I'm still on my vegetable kick this week. I know I put you through that whole thing on Swiss chard last week, but this time will be different--we're back to cupcakes! It's always been interesting to me how someone could have come up with the idea of putting a vegetable into a cake. I read somewhere that it was a ploy to get kids to eat more vegetables. Whatever the case, it works, and our topic du jour involves the zucchini!
To be honest, the zucchini is not really a personal favorite. The best thing about the zucchini is the crisp outside, but when cooked, it's mostly mushy and can be a little blah in flavor (in my opinion). Usually, when served as a side dish, steamed or sauteed, it seems to require a lot of salt and pepper to compensate for the blandness. I tried reading up on the zucchini to try to appreciate it a little more, and I learned from Wikipedia that the zucchini is the "swollen ovary of the female zucchini flower". Hm...think about that the next time you have some. All said, my relationship with zucchini is a little ambivalent. (So far, I'm not doing a good job of promoting the zucchini, am I.) Zucchini cupcakes (and zucchini bread) are a whole other story, however. I was originally looking for something kind of different and unique to make for a friend's birthday, and I came across this zucchini cupcake recipe from Epicurious.com, which included honey, crystallized ginger and orange zest. Perfect. The flavor combination looked intriguing, and it didn't involve a lot of guilt (anything with zucchini must not be that guilty). Also, one of my favorite things about this recipe is grating the zucchini. Yeah, I know, a little weird. Zucchinis are firm, but not hard (like carrots! I generally avoid grating carrots by hand if I can) making the grating process nearly effortless and sort of therapeutic (repetitive, mindless motions get me into a zone).
The original recipe calls for coarsely grated zucchini, and when I made it the first time, the cupcakes seemed a little hearty but turned out really moist, with a nice subtle ginger and citrus zing. I made this recipe again last week, grating the zucchini more finely and baked it up as a loaf (I didn't care so much about presentation this time around--I planned on eating most of it). It turned out a little drier (just a little)--could it be a product of how finely I grated the zucchini? Or maybe because it was a loaf instead of individual cupcakes? Nonetheless, I offered to give some of the zucchini loaf to another friend to try, but it didn't quite make it to her. (I'll make this again for her another time.)
 Zucchini Ginger Cupcakes(adapted from Epicurious.com)Makes about a dozen cupcakes or one 9" loaf2 cups all-purpose flour1 t. ground ginger1 t. ground cinnamon1 t. finely grated fresh orange zest1/3 cup coarsely chopped crystallized ginger (or chop more finely, as preferred)1 t. salt1 t. baking soda1/2 t. baking powder3/4 cup vegetable or mild olive oil3/4 cup mild honey (I've also used brown sugar instead)
2 large eggs, lightly beaten
1 t. vanilla
2 cups grated zucchini (about 2 medium zucchinis)
Preheat the oven to 350F degrees and line the cupcake pan or grease the loaf pan.In a bowl, use a wire whisk to combine the dry ingredients (not including the brown sugar, if using). In a separate bowl, whisk the oil, honey or brown sugar, eggs, vanilla and zucchini until just combined. Mix in the flour mixture on low or by hand.Pour the batter into the cupcake pan or the loaf pan and place on it the middle or upper third rack in the oven. The cupcakes take about 20-25 minutes to bake, or 45-50 minutes if using a loaf pan. Allow to cool in the pan for about 5 to 10 minutes, then remove from the pan and cool on a cooling rack.If you're making cupcakes, you can use the following cream cheese frosting recipe, which adds a little more verve!Ginger Cream Cheese Frosting8 oz cream cheese, softened2 T. unsalted butter, softened1 cup powdered sugar1 t. vanilla1/2 t. ground ginger1/2 t. ground cinnamon1/2 t. finely grated fresh orange zestCream the cream cheese and butter together in a mixer on medium until fluffy. Add the remaining ingredients and continue mixing. If the frosting is too thick, you can also add a teaspoon of milk at a time to soften it.
I've been kind of slacking, a little lethargic with all that holiday food and trying to get back into the work mode (yesterday in the office was very very tough to get through). But really, my excuse for not posting something sooner is that I've been thinking about what recipe to write about over the last couple of days (really). Over New Year's, I'd been surrounded by so much good food, I couldn't decide what to write about! I made some thumbprint cookies--which were really more like index-finger-print cookies because I made them a little too small--for coworkers, and then there was this really yummy baked apple pancake a friend showed me how to make on New Year's Day while half-watching the Rose Bowl (missing most of the game turned out to be just fine since Penn State lost to USC, so sad), and then there was this beautiful fresh blueberry (yes, fresh blueberries in January! Imported from Chile, apparently) pie another friend made for a post-New Year's Day dinner--but I can't remember the name of the book the recipe came from... Now, as I sit here typing, though, with my belly distended and feeling like it could pop (and believe me, I'm not pregnant), I'm more and more convinced that I should probably start out 2009 with something other than a pastry and instead begin the new year with...a vegetable(!). I really hope I haven't disappointed you with that. It won't be so bad, I promise.
 I'm kind of unlearned as far as vegetables go, spending more time making desserts than main courses. But until just a couple of months ago, I had never tried Swiss chard in my entire life. (I haven't lived an incredibly long life or anything, but I'm certainly beyond my teenage and college years during which my main diet consisted of burgers and pizza--though I still love both!) Swiss chard has always sounded a little fancy to me--so European (you know, "Swiss" and all), kind of bourgeois. And I didn't know what to do with those giant, tough green leaves. Then I read this article in The New York Times' Recipes for Health column that brought it down to my level, made it more approachable, and I learned that Swiss chard doesn't really have much to do with Switzerland at all.

I scoped out the Saturday Farmer's Market where I live and found the swiss chard (which was not a difficult to do since it was, and still is, in season). It was only a dollar for a nice big bunch! And they also came with different colored stalks, instead of all green, which made them look so pretty. I felt kind of accomplished making my first purchase of swiss chard and it was such a deal! (I kind of get excited about good deals.) I brought my swiss chard home, carefully washed the dirt off the leaves and stems, chopped them up and made the Swiss Chard and Red Pepper Gratin recipe that was published in The New York Times article (with some slight variations). It baked up so beautifully, like a frittata, with all the colors reflective of fall that made me feel so...well...warm and fuzzy. The Swiss chard also had a mild flavor, though somewhat similar to spinach, but didn't leave that gritty film on my teeth the way spinach does. I made the gratin again recently for the post-New Year's Day dinner, and everyone really enjoyed it (at least that's what they said, maybe they were being nice, but I'd like to think they were being honest). Swiss chard is now my new favorite vegetable.
 Swiss Chard and Red Pepper Gratin
(adapted from The New York Times recipe)
Serves about 6 as a side dish
olive oil
About 1-1/2 pounds of Swiss chard
1 medium onion, chopped
2 cloves of garlic, minced
1 red pepper, chopped
1/4 pound of Gruyere cheese (or other similar type of cheese, like robusto), shredded
1/2 cup of brown rice (the original recipe calls for arborio rice)
3 large eggs, beaten
1/2 cup of low fat milk
1/2 t. dried thyme (or 1 t. of fresh thyme)
1 t. salt (or to taste)
1/2 t. pepper (or to taste)
2 T. bread crumbs
Wash the Swiss chard thoroughly, and trim the leaves from the stalks. Cut the stalk into 1" pieces, and roughly chop the leaves. Divide the leaves from the stalks. The original recipe calls for blanching the Swiss chard before stir frying, but I skip this step to save time. In a pot, over medium heat, stir fry the onions in olive oil until fragrant. Add the garlic and stir fry for another minute or so, then add the chopped Swiss chard stalks, red pepper, salt and pepper and continue to stir fry until the vegetables turn a little tender. Gradually mix in the Swiss chard leaves in bunches and stir constantly until the leaves wilt. Remove the pot from the heat.
Preheat the oven to 375F degrees. Grease a 5"x7" casserole dish with olive oil.
Mix the cheese into the vegetables in the pot. Beat the milk into the eggs in a separate small bowl, and pour the mixture into the pot, then add the rice and thyme. Mix the ingredients together in the pot, then pour it into the casserole dish, light patting down the vegetables to create an even surface. Sprinkle the bread crumbs over the top. Bake for about 40 to 45 minutes, until the top browns. Remove the casserole dish from the oven and let it cool for about 10 minutes. The New York Times says it can be served warm or at room temperature, but I prefer it served warm.
Now that you've sat through my dirge on how great Swiss chard is, here are photos of the baked apple pancake and the blueberry pie as a treat. Mmm...


 If you haven't already picked up on it, I try to be healthy. My friends might consider that an understatement. "Health nut" sums it up pretty well. I can border on obsessive when it comes to healthy eating (with all that information on the web, how can it not make anyone paranoid?), which doesn't always go hand in hand with pastries, sadly. I think that's partially why I like to bake for other people rather than myself. I can use all that butter and sugar and other good stuff freely--not because I don't care about their well-being, of course(!), and I do believe there is the right time to let those cares go and really savor food, whether it's "good" for me or not. But when it comes to baking or cooking something only for myself, I can endure the cardboard taste simply because I tell myself it's good for me. Once in a while, though, I come across something that just might be able to be shared with non-health-nuts and health-nuts alike.
 Every so often, I go through an oatmeal phase. It kind of warms me up from the inside, especially useful for these cold days. And since last week, I've been contemplating, mulling over, engrossing myself with oatmeal. A bowl of hot oatmeal is wonderful in its simplicity, but oatmeal in cookies, in cake, or as a muffin provides a different indulgence. Oatmeal is the kind of food that makes you feel good about yourself. Eat an oatmeal raisin cookie, and I feel like I'm getting my daily intake of dietary fiber. Add it to chocolate chip cookies, and suddenly I'm convinced they're good for me. Yes, this is all self-deception, but oatmeal always makes me feel like home. So you can put away your bowl and lay aside your spoon, you're not going to need them for this oatmeal recipe.
 Honey Oatmeal Cake


