Today I saw an article on yahoo.com announcing that cupcakes were one of seven food fads that are going out of style. Are cupcakes really losing their cool? Reading that immediately prompted me to write an entry here to make the point that cupcakes could not possibly be going by the wayside. While people are always looking for the latest and greatest, does that--should that--apply to food, especially dessert, as well? Food is one of those things that we would find completely disappointing if it were to change or go away. When I go to a restaurant, and I am treated to an amazing dish, I go back precisely to have the same experience again. And so with the cupcake. With that, I have my top five reasons for why cupcakes should not be cast aside:
1. Cupcakes have built-in portion control. At a time when dietary intake is a primary concern, cupcakes make it easier to restrict yourself to one serving.
2. Cupcakes are green. Since they can be hand-held, no extra plastic forks or paper plates are required.
3. Cupcakes help the economy. At easily $3+ dollars a pop, the local mom and pop bakeries can stay afloat.
4. Cupcakes make even an average baker look spectacular. Cupcakes can look cute and charming and delectable with less effort than many other desserts, even cake.
5. Cupcakes remind you of your childhood. And how can anyone resist returning to that innocence and those days of being carefree? (Actually, cupcakes remind me of NYC, where I had my first cupcake fad experience--and I *love* NYC).
Okay, I'm being a little silly. I do still love cupcakes, though, for the reasons above--especially the last two. It is a funny thing to me that food, like fashion, can be faddish. I wonder why we, as people, can't be completely satisfied by the same things that once satisfied us before. I suppose that's a deeper question for another time... Maybe you can tell me whether you still love cupcakes for what they are--cute, delicious baked goods--or if you're beginning to abandon them as a past trendy craze (don't worry, I won't take it personally).
Banana Cupcakes
Adapted from Martha Stewart.
Makes about a dozen cupcakes.
1-1/2 cups all purpose flour
3/4 cup sugar
1 t. baking powder
1/2 t. baking soda
1/4 t. salt
1/2 cup butter, melted
1-1/2 cups mashed ripe bananas (about 3)
2 large eggs
1/2 t. vanilla
Preheat oven to 350F degrees and line cupcake pan.
In a bowl, whisk flour, sugar, baking powder, baking soda and salt together. Mix butter, bananas, eggs and vanilla into flour mixture. Divide batter into cupcake wells. Bake until a toothpick comes out clean, approximately 25-30 minutes. Remove cupcakes from pan and cool on a rack.
Cream Cheese Whipped Cream Frosting
8 oz. reduced fat cream cheese, softened
1/2 cup sugar
1 t. vanilla
1/2 t. almond extract
2 cups heavy cream
Using an electric mixer, cream together the cream cheese, sugar, vanilla and almond extract. Using the whisk attachment, whip in the heavy cream, until stiff peaks form.
 As I'm typing this, I'm planted on my sofa in front of the TV. I am an Olympics junky. There is something about the triumphs and spills of competition at the Olympics, and getting caught up in the stories behind the athletes who train for years for a singular moment that determines their place in the world. It never ceases to amaze me all the sacrifices these athletes make and the injuries and adversity some of them overcome to get to this point, all to have the chance to be crowned number one in their sport. It reminds me just how resilient the human spirit can be, that come what may, people have the ability to grow from hardship and not only survive but also excel.
Sadly, watching the Olympics can also make me wonder what I'm doing with my own life and consider what I have "accomplished" so far.

But at the same time, I do wonder what person I would become if I were "great" at something the way these athletes are. Would I be able to maintain any sort of humility and remember that all my abilities are really not my own but a gift? Knowing myself, there is a pretty good chance that I would forget all that and revel in my achievements. (I already forget and I don't even think I've accomplished that much.) Maybe what's truly admirable are those who stay humble when they have done so much.
NBC is showing the half pipe competition, and I'm waiting to see Shaun White *throw it down* (as the announcer would say) for the finals in the hopes of back to back gold medals. As you can imagine, with all this time in front of the TV, there isn't a whole lot of time to be baking (or doing much else), so I have no new recipe today. Instead I'm posting photos of cupcakes I made for a recent dinner, using the same recipe from my very first post, which has always proven to be a winner. (I really think it's the ganache that does it). I think I'll go back to enjoying watching the games now and just appreciating the amazing things these athletes can do.

 Graduation season has just passed and the kids are all on summer vacation. I'm long out of that period of my life where I would be looking forward to graduating from an educational institution, but this time of the year does make me look back with some nostalgia. There was always so much excitement and anticipation, a world to discover, and I was in some ways eager to grow up, which would be marked by graduating from elementary school, junior high, and so on. Now I kind of wish I savored those days more.
About two weeks ago I went to my cousin's graduation party. He was graduating from junior high, and when I saw him, he was cool with hair like Adam Lambert and designer frames. When I was his age, I was geeky with braces, teased bangs and large round glasses that were more functional than stylish. Sometimes thinking about it makes me cringe, all the awkwardness of growing up and "finding yourself". (Although...I think I still haven't outgrown my awkwardness.) But despite that youthful blundering, the earnestness and hope seem to dissipate with age, often replaced by cynicism, and I wish I could recapture some of that innocence.

So what does coconut have to do with graduating and growing up? Not a whole lot except that one of the guests brought the most amazing coconut layer cake I had ever tasted. She said she got the recipe from Martha Stewart's (there she is again!) website--the Ultimate Coconut Cake, and it really did live up to its name. She (the guest, not Martha) told me she spent two days making it, which was a bit discouraging.
However, craving something coconutty, I settled with making coconut cupcakes, also from Martha Stewart. But I made the cardinal mistake that every baker should know not to make, and that was: I didn't read the recipe beforehand. This resulted in an extra half stick of butter mixed into the batter, which made it taste like a pound cake--not too bad, certainly denser. I made one or two other (intentional) variations, like adding almond extract instead of vanilla to complement the coconut, and it did well to satisfy my craving to have another piece of the cake. Definitely not the same, but close enough.

Coconut Cupcakes
Adapted from Martha Stewart's recipe
Makes about a dozen cupcakes
Preheat the oven to 350F degrees, and line cupcake tin with liners.
1. Sift together in a bowl:
- 1-1/2 cups cake flour
- 1/2 t. baking powder
- 1/4 t. sea salt
2. In a separate bowl, using an electric mixer on medium, cream together until light in color and fluffy:
- 1 stick (1/2 cup) unsalted butter, at room temperature
- 1 cup sugar
3. Continue beating in the following, one at a time:
- 2 large eggs, room temperature
- 1/2 t. almond extract
4. On low speed, mix in the flour mixture from #1, then add in:
- 1/2 cup coconut milk
5. Distribute batter evenly among the cupcake wells, and bake for about 15 minutes. Remove from oven and allow to cool completely on a rack.
To make the frosting:
Cream together the following:
- 8 oz. cream cheese
- 1/2 stick of unsalted butter
- 1-1/2 cup powdered sugar
After frosting the cupcakes, sprinkle shaved or shredded coconut on top.
 I've been trying to get this post out but I've been at the mercy of my fickle internet service, which is back up again this morning (yay!). It's Saturday now but it's been feeling like one long Monday, and not because I couldn't get on line (though that probably didn't help). A long, long, looong Monday, that, now that I think of it, started somewhere last week, actually. It's one of those times when life just, well, sucks the life out of you. And Spring seems to have taken its own vacation around here and the clouds have rolled in again--perhaps somewhat appropriately. I really did have grand plans for this post, like cute little stories from my childhood and reflections on the joy of youth--you know, something terribly profound and thought-provoking, but I've lost the inspiration even before I've begun so maybe another time will do but not today.
 The highlight in my long "Monday", though, was that I managed to do one of my favorite things on a Saturday morning this last weekend, and that was to go to the local farmers' market. Farmers' markets are really the place to be for a weekend morning, to leisurely stroll along the vendor stands and watch people with baby strollers and reusable shopping bags, as they mull around the organic produce laid out in crates and boxes. Gone is any affectation, replaced by a little more sincerity. I usually go not really with a shopping list in mind, but just to see what's in season and what looks enticing and to people watch or spend quality time with a friend, but this time, I had purpose: I was going to buy a plant for my new apartment. I have never bought a plant, never had any inclinations toward cultivating a green thumb, but decided I needed one just to brighten up my place and make it more homey and welcoming. But I didn't know what to get ("a wise bowl of sage"? maybe too clever...only at a farmers' market), so instead I saw a table of lovely, fresh strawberries beckoning, and I could not resist. Instead of a plant, I came home with the lovely strawberries, which then later turned into some not-nearly-as-lovely-but-they'll-do strawberry cupcakes (I found the recipe at pickycook.com; I didn't get enough air into the butter so they baked up a little heavy and my frosting didn't come out so smooth, but the taste, it was what you would think a fresh Spring day would taste like if you could put it into a cupcake...mmm).
And my mission to get a plant? I got daffodils from Trader Joe's that were so cute when I first picked them up it was enough to dispel any blues momentarily, but they have only since wilted considerably, in just a matter of days. What could I have done wrong? I watered it faithfully, put it by the window for light, and all I can think of that was that maybe, just maybe, I didn't talk to it enough--or at all. My very first plant ever and I have already almost killed it in record time. Another thing to chalk up to the blues. But tomorrow is Easter Sunday, and that is always a marker of hope.
 Strawberry cupcakes
Adapted from the recipe at pickycook.com (thank you Picky Cook!)
Makes about a dozen
For the cupcakes:
Preheat the oven to 350F and line the cupcake tin.
1. Puree in a food processor or blender:
- 1 cup of fresh or frozen strawberries (hulled) (there will be extra for the frosting)
2. Whisk together with a wire whisk:
- 1-1/2 cup all purpose flour
- 1 t. baking powder
- 1/4 t. kosher salt
3. In a cup, combine:
- 1/3 cup milk
- 1-1/2 t. vanilla extract
- 2/3 cup strawberry puree from #1
4. Cream together in a mixing bowl until light and fluffy:
- 1 stick (1/2 cup) butter, at room temperature
- 1 cup of sugar
5. Add to the mixing bowl and mix to combine:
- 1 large egg, at room temperature
- 2 large egg whites, at room temperature
6. Mix into the butter and egg mixture from #5 on low: the flour mixture from #2 and the milk and strawberry puree from #3, alternating between each but beginning and ending with the flour mixture.
7. Bake for about 20 to 25 minutes or until a toothpick comes out clean. Cool in pan for about 5 minutes, then cool on a rack completely.
For the frosting:
1. In a mixing bowl, using the paddle attachment, cream:
- 2 sticks (or 1 cup) of butter
2. Mix in, until smooth:
- 3 cups powdered sugar
- 1/2 t. salt
- 1 t. vanilla
- 1/3 cup strawberry puree

 This past week has been a little bit crazy. There's always work, and I've been trying to train for a 10K which I hope to run the end of next month (operative word being "trying"), and I was getting ready for an Oscar party a good friend was hosting--which turned out so nice and fun! I usually get sucked into the glamor of the Oscars, and the Academy Awards is the one award show I watch every year. One year in high school, I got to work at the Academy Awards bringing people up to the press box in the elevator. I was so thrilled, and I remember seeing Marisa Tomei that year, who had won for best supporting actress for her role in My Cousin Vinnie. She was surrounded by photographers and reporters, looking elated, and I fell in love with her dress (I think it was a Chanel?) and thought she was adorable (she looked great this year too). I've been an Academy Awards devotee ever since.

For the Oscar party, my friend laid out a red carpet with gold balloons in her house, and we invited some ("some" grew to be about 25) good friends, a number of whom have young children now--and for once, this was an event I didn't bake for at all. My friend who hosted the party made a chocolate cake with a frosting reminiscent of thick chocolate milkshake--thinking about it now makes my mouth water. It was all a little chaotic with kids and food everywhere, so I don't think I even really watched much of the Oscars at all. But it was worth missing to catch up with friends, at least as best I could amid the noise--though I was able to catch the last award (and, in my mind, the most important award) for best picture, which went to Slumdog Millionaire (hooray!).
So all that to say...I didn't bake anything new this past week at all. In thinking about what recipe I could possibly share with you for this post, I decided on red velvet cupcakes--which, in the world of cupcakes, deserves its place on the red carpet as far as I'm concerned. (Unfortunately, they don't look as red in the pictures as they did in real life.)
 Red Velvet Cupcakes
(I don't remember where I got this recipe from)
Makes about 18 cupcakes
2 cups all purpose flour
1/3 cup unsweetened cocoa powder, Dutch-processed
1 t. salt
1 stick (1/2 cup) butter, softened
1-1/2 cups sugar
2 large eggs, room temperature
1 t. vanilla
1 cup buttermilk
2 T. red liquid food color
1-1/2 t. baking soda
1 T. apple cider vinegar
Preheat oven to 350F degrees, and line cupcake pans with paper liners.
In a bowl, whisk together the flour, cocoa powder, and salt with a wire whisk. In another bowl, cream butter and sugar together until fluffy and light in color. Mix in eggs, one at a time, and vanilla, scraping down the bowl in between eggs. Combine the food color with the buttermilk, then add the buttermilk mixture and flour mixture, alternating between each mixture in 3 turns. Mix in the baking soda and vinegar until combined. Pour the batter into the cupcake wells. Bake on the middle rack for approximately 20 to 25 minutes or until a toothpick comes out clean. Cool in the pan for 5 minutes, then transfer to a wire rack to cool completely.
For the frosting, you can use a cream cheese frosting (but without the orange zest; and which I read somewhere is not the traditional frosting even though I've only ever had red velvet cupcakes with cream cheese frosting), and garnish with chopped pecans on top.

 I think green is my favorite color. I "think" because it kind of depends on what mood I'm in too, like when I want fun shoes or in choosing my stand mixer, I like red, or when I want a bright top, I sometimes like orange, but only if I'm wearing it with jeans, otherwise pink sometimes does the trick. And then there are M&Ms. I don't eat them often, but if I have them, usually they're in my trail mix and I only eat the green ones, but if I'm in the mood for more chocolate, I'll eat the orange ones, too. Green seems to be the color I always come back to. The color just speaks fresh, calm, and clean.
These days, or maybe it's always been the case, green also represents the color of environmental responsibility. I have some friends, a couple, who decided to take steps beyond putting plastic bottles in recycling bins, and started their own compost in their backyard. It was the first time I'd known someone personally to do something like that. Sometimes I think that what little I do won't make a difference, but they showed me that even if there is only the hope that every little thing can count, and if we can do something, then why not?
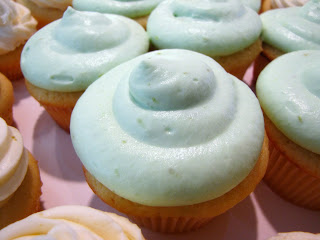
 I helped throw a baby shower for these friends this past weekend, and how appropriately, though probably not intentionally, they chose the baby shower theme color to be a moss green. Since I was baking cupcakes for the shower, I was trying to think of a flavor that would work with the color, so I came up with lime cupcakes! Kiwi just didn't seem right, but lime was more feasible. I don't see lime as a cake or cupcake flavor very often, or at all, but if lemon is a popular flavor, then why not lime? Using a recipe for yellow cupcakes from The New Best Recipe, which has great recipes for every course of a meal, I added lime zest and lime juice, and they turned out wonderful! And for the frosting, instead of the cream cheese frosting which is often used on lemon cupcakes, I wanted a fluffier and softer texture, so I made a lime curd and mixed it with whipped cream. I have extra frosting in my freezer now, which tastes amazing on its own, like a mousse!
I can't claim that these cupcakes are environmentally friendly, but when you read the instructions on how to make the cupcake portion, you'll see that you don't waste much effort. The cupcakes come out pretty close to perfect even if all you do is throw all the ingredients together in the bowl and mix! Unfortunately, when I made these for the shower, I forgot to add the baking powder for half of them, so they didn't rise and were dense! It was late, and I served them anyway, and some guests thought they were meant to be like that!

Lime Cupcakes
Adapted from The New Best Recipe
Makes about one dozen
1 stick or 1/2 cup of unsalted butter, softened
1-1/2 cups unbleached all purpose flour
1 cup sugar
1-1/2 t. baking powder
1/2 t. salt
1/2 cup buttermilk
1 large egg, plus 2 large egg yolks, room temperature
1/2 t. vanilla
The zest and juice of one regular lime (not key limes, which are small; if using key limes, use 2 or 3)
Preheat the oven to 350F degrees, and line the cupcake pan with liners.
Cream the butter in a bowl using a mixer on low to medium speed. Once light and fluffy, add all other ingredients and mix together until combined and smooth.
If this last step seems too risky, cream the butter with the sugar, then combine all the wet ingredients (buttermilk, eggs, vanilla, lime juice and zest) and mix together. In a separate bowl, whisk together the dry ingredients (flour, baking powder, and salt), then add the dry ingredients to the wet ingredients and mix until the batter is smooth.
Divide the batter equally among the cupcake wells in the cupcake pan, and bake on the middle rack for about 20 to 25 minutes or until a toothpick comes out clean. Cool in the pan for about 5 minutes, then cool the cupcakes on a cooling rack.
Lime Curd Whipped Cream Frosting
Adapted from epicurious.com
For the lime curd:
3 large eggs
1/2 cup of sugar
the zest and juice of 2 regular limes (about 1/4 cup of juice)
3/4 stick of butter,
cubed
For the whipped cream:
1/2 cup of heavy cream
1/2 cup of powdered sugargreen food coloring (optional)In a saucepan whisk the eggs, sugar, lime juice and lime zest together. Over low heat, add the butter and continue to whisk the mixture. Continue doing so until it thickens and begins to bubble. You can increase the heat gradually if the mixture does not thicken. Once you can see whisk marks in the curd, remove the saucepan from heat and pour the curd through a sieve if it's a little lumpy. Allow the curd to cool and refrigerate the curd in a covered container until chilled (I did this overnight).
When ready to make the frosting, beat the heavy cream and powdered sugar with the whisk attachment on high until stiff peaks form. Add a little green food coloring just enough to tint the frosting (a couple of drops if using liquid), and fold in about 1/4 cup of the lime curd, then add another 1/4 cup (you'll have leftover lime curd). Chill the frosting to allow it to set. Frost the cooled cupcakes with a spatula or piping bag.

 I'm still on my vegetable kick this week. I know I put you through that whole thing on Swiss chard last week, but this time will be different--we're back to cupcakes! It's always been interesting to me how someone could have come up with the idea of putting a vegetable into a cake. I read somewhere that it was a ploy to get kids to eat more vegetables. Whatever the case, it works, and our topic du jour involves the zucchini!
To be honest, the zucchini is not really a personal favorite. The best thing about the zucchini is the crisp outside, but when cooked, it's mostly mushy and can be a little blah in flavor (in my opinion). Usually, when served as a side dish, steamed or sauteed, it seems to require a lot of salt and pepper to compensate for the blandness. I tried reading up on the zucchini to try to appreciate it a little more, and I learned from Wikipedia that the zucchini is the "swollen ovary of the female zucchini flower". Hm...think about that the next time you have some. All said, my relationship with zucchini is a little ambivalent. (So far, I'm not doing a good job of promoting the zucchini, am I.) Zucchini cupcakes (and zucchini bread) are a whole other story, however. I was originally looking for something kind of different and unique to make for a friend's birthday, and I came across this zucchini cupcake recipe from Epicurious.com, which included honey, crystallized ginger and orange zest. Perfect. The flavor combination looked intriguing, and it didn't involve a lot of guilt (anything with zucchini must not be that guilty). Also, one of my favorite things about this recipe is grating the zucchini. Yeah, I know, a little weird. Zucchinis are firm, but not hard (like carrots! I generally avoid grating carrots by hand if I can) making the grating process nearly effortless and sort of therapeutic (repetitive, mindless motions get me into a zone).
The original recipe calls for coarsely grated zucchini, and when I made it the first time, the cupcakes seemed a little hearty but turned out really moist, with a nice subtle ginger and citrus zing. I made this recipe again last week, grating the zucchini more finely and baked it up as a loaf (I didn't care so much about presentation this time around--I planned on eating most of it). It turned out a little drier (just a little)--could it be a product of how finely I grated the zucchini? Or maybe because it was a loaf instead of individual cupcakes? Nonetheless, I offered to give some of the zucchini loaf to another friend to try, but it didn't quite make it to her. (I'll make this again for her another time.)
 Zucchini Ginger Cupcakes(adapted from Epicurious.com)Makes about a dozen cupcakes or one 9" loaf2 cups all-purpose flour1 t. ground ginger1 t. ground cinnamon1 t. finely grated fresh orange zest1/3 cup coarsely chopped crystallized ginger (or chop more finely, as preferred)1 t. salt1 t. baking soda1/2 t. baking powder3/4 cup vegetable or mild olive oil3/4 cup mild honey (I've also used brown sugar instead)
2 large eggs, lightly beaten
1 t. vanilla
2 cups grated zucchini (about 2 medium zucchinis)
Preheat the oven to 350F degrees and line the cupcake pan or grease the loaf pan.In a bowl, use a wire whisk to combine the dry ingredients (not including the brown sugar, if using). In a separate bowl, whisk the oil, honey or brown sugar, eggs, vanilla and zucchini until just combined. Mix in the flour mixture on low or by hand.Pour the batter into the cupcake pan or the loaf pan and place on it the middle or upper third rack in the oven. The cupcakes take about 20-25 minutes to bake, or 45-50 minutes if using a loaf pan. Allow to cool in the pan for about 5 to 10 minutes, then remove from the pan and cool on a cooling rack.If you're making cupcakes, you can use the following cream cheese frosting recipe, which adds a little more verve!Ginger Cream Cheese Frosting8 oz cream cheese, softened2 T. unsalted butter, softened1 cup powdered sugar1 t. vanilla1/2 t. ground ginger1/2 t. ground cinnamon1/2 t. finely grated fresh orange zestCream the cream cheese and butter together in a mixer on medium until fluffy. Add the remaining ingredients and continue mixing. If the frosting is too thick, you can also add a teaspoon of milk at a time to soften it.
I know I'm too late for Thanksgiving on this one. I simply couldn't get this posted in time, what with work and going out of town to see my family, but I still want to share this one with you because they're so good and I still crave pumpkin goods even after Thanksgiving. Maybe you can use it for next year--or be a little nontraditional and make them any time of the year.

I tried making these pumpkin cupcakes for a friend who was giving me a ride to the airport last week, and I loved how they made the house smell. I read somewhere recently that the first thing a person notices upon entering a room is the scent. Nothing beats the aroma that comes from the oven, which makes the home welcoming. It even creates a sense of anticipation, because it usually means something good is ahead--or at least there is the hope of something good! And nothing says "cozy" the way apple pie or chocolate chip cookies in the oven does, which no candle or air freshener can mimic. (I have a "Sugar Cookie" scented candle that really does smell just like sugar cookies, but it only leaves me unsatisfied.) Fortunately, the finished product here does not disappoint.
I was originally going to try to make these pumpkin cupcakes after Halloween from scratch. I mean, completely scratch--as in, gut and roast the pumpkin, scoop out and puree the flesh, etc. It didn't seem hard, and thought it'd be kind of cool to be able to say, yeah, I roasted the pumpkin myself. After all, my roommate had bought a pumpkin for Halloween, so why not make full use of it? Except, when I roasted it, the flesh turned yellow (not the nice orange hue you always see), it smelled really strange (I have no words to describe it), and it was extremely fibrous (fiber is good for you, but can you imagine taking a bite out of stringy pumpkin pie?). I learned that pumpkins from pumpkin patches are not ideal for cooking (if I had done my homework a little better beforehand, I would have known this). Thank goodness for organic pumpkin puree in a can from Trader Joe's.
 So here it is, pumpkin cupcakes...with pumpkin from a can...after Thanksgiving...but they still smell heavenly.
Pumpkin Cupcakes
(Sadly, I don't remember where I got the original recipe so I'm not able to give credit where it's due.) Makes about 18 cupcakes
2 cups unbleached all-purpose flour
1 tsp. baking soda
1 tsp. baking powder
1 tsp. salt
1 tsp. ground cinammon
1 tsp. ground ginger
1/4 tsp. ground nutmeg
1/4 tsp. ground cloves
1 cup packed brown sugar
3/4 cup granulated sugar
14 T. (or 1 3/4 sticks) melted unsalted butter (cool to about room temperature)
4 large eggs
1 15 oz. can of pumpkin puree
- Preheat the oven to 350F degrees, and line the cupcake pan.
- Combine the dry ingredients, except for the sugars, in a bowl, and whisk together.
- In another bowl, use a whisk to combine the brown sugar, granulated sugar, butter and eggs.
- Add the flour mixture to the the wet ingredients and mix completely; then add the pumpkin puree and mix until combined.
- Fill each cupcake well about 3/4 full and bake for approximately 20 to 25 minutes. The cupcakes are done when an inserted toothpick comes out clean.
 I had originally planned to frost these with a cream cheese frosting similar to what I had used for the carrot cupcakes, but after trying one, I thought they were great on their own.
Autumn is my favorite season of the year. I like Springtime, too. But there is something about the fall, when the air is crisp and the leaves change colors. I made a trip to the Boston/New England area a couple of years back in October, that was simply breathtaking (I felt like I had stepped into Little Women). Where I live now is nothing like it, but in contrast to where I grew up (the cosmopolitan, concrete-laden Los Angeles), watching the trees--real leafy trees, not palm trees--around my neighborhood turn red, orange and yellow is still beautiful to me. Autumn also means the holidays are nearing! Maybe they are too commercial (after all, one of the most anticipated events right after Thanksgiving is Black Friday), but there's something to be said about time set aside to spend with the people you love (even if some of them may drive you crazy at times, as family often does) if for no other reason than to share a meal and to try to remember that we still have much to be thankful for (because it is so amazingly easy to forget).
 When I think about food for the holidays, I think about foods that make me feel warm and cheerful. That usually includes things like pumpkin pie (love the pumpkin pie), sweet potatoes, gingerbread, chocolate anything and my mom’s cooking (she is an incredible cook). While not a conventional Thanksgiving dessert—no pumpkin involved—carrot cupcakes have risen to that level for me. I’m referring specifically to the carrot cake recipe from Sherry Yard's The Secrets of Baking (another birthday gift!), which uses brown butter to give it a complex nutty flavor. I first attempted this recipe about two months ago, and cannot stop making them (I just made a batch using carrots and coconut the other day after work to put in the freezer so I could have them whenever I want). The brown butter gives the carrot cake a sort of vitality that holds its own even if additional traditional "fillers" (e.g. walnuts, raisins) aren't on hand. Carrot cupcakes may not be a traditional Thanksgiving dessert, but it's always an American favorite according to Sherry Yard, and I think they could still be a nice way to finish off a turkey dinner. I've adapted the original recipe here for cupcakes and to make the recipe a little less complicated. (Side note on Sherry Yard's book: my favorite pastry cookbook I’ve come across so far; she goes into the chemistry of baking to help you understand techniques and their purposes, and it's organized in such a way for you to mix and match recipes to spur your creativity—very educational).
First, on browning butter: melt butter in a small saucepan over low heat, stirring constantly, until it turns light brown (kind of obvious, I know). During the process, the butter will foam and bubble, and the fat solids will start to turn colors so you'll have darkened bits of butter in the pan. Be careful, though, it quickly goes from brown to black (this happened to me the first time I tried it--I stepped away for less than a minute and the next thing I knew, all the bits were black. Black butter is more bitter and may have different uses, but we're not going for that here). For the carrot cupcake recipe below, let the brown butter cool to about room temperature--don't refrigerate it so it'll remain in a liquid state.

Carrot Cupcakes
(adapted from "Carrot Cake" in The Secrets of Baking by Sherry Yard)
Makes approximately 18 cupcakes
1/2 cup all purpose flour (sifted)*
1/2 cup whole wheat flour (sifted)*
1/2 cup almond flour
1 t. baking powder
1 t. baking soda
1 t. ground cinnamon
1 cup brown sugar, packed
1/2 cup regular granulated white sugar
3 large eggs at room temperature
1 T. vanilla extract
1/2 pound (or 2 sticks) unsalted butter*, browned (still liquid and including bits that may be stuck to the pan)
2 cups grated carrots
Optional additional ingredients: walnuts, coconut, raisins (or anything else you’d like; about 1 cup of each, if using)
- Preheat the oven to 350F degrees, and line the cupcake pan.
- Sift the all purpose flour, whole-wheat flour, almond flour, baking powder and baking soda into a mixing bowl. Use a whisk to combine.
- In another bowl, whisk the eggs. Add the brown sugar, sugar, cinnamon and vanilla, and whisk together by hand.
- On low speed, using the paddle attachment if you have a stand mixer, add the egg and sugar mixture to the flour mixture. Once incorporated, mix on medium for about 2 minutes. Scrape down the sides of the bowl.
- Returning the speed to low, gently pour in the brown butter. Once the butter has been incorporated, scrape down the sides of the bowl, then turn the mixer to high for about 2 to 3 minutes (mixing on high will help incorporate more air into the batter).
- Gently fold in the carrots and any additional ingredients by hand, using a wire whisk or with a spatula.
- Pour the batter into the cupcake pan, filling each well almost full but not up to the rim, about 3/4 of the way.
- Bake the cupcakes for about 20 to 25 minutes, and use a toothpick to check for readiness. Cupcakes are ready when the toothpick comes out clean. Cool the cupcakes in the pan for a couple of minutes, then transfer them to a rack to cool completely.
*Recipe notes:
- The original recipe called for 1 cup of all-purpose flour, but I try to make some of my baked goods a little healthier so I use 1/2 cup of wheat flour--which also adds to the nutty flavor, in my opinion.
- You can substitute applesauce for butter to reduce the fat content, but at most, use 1/2 cup of applesauce and 1 1/2 cups of butter (to total the 2 cups called for). Also, if using applesauce, incorporate the applesauce before adding the brown butter; and I recommend refrigerating the batter for about an hour before baking--the cupcakes bake up more rounded and won't spread as much.
You can use an icing or cream cheese frosting to top the carrot cupcakes off. After trying both, I prefer the cream cheese frosting for both taste and presentation.
Cream Cheese Frosting
When it comes to making frosting, I almost never do the same thing twice because I add ingredients as I make it to get to the consistency I like, which is usually on the softer side. As you can see from the picture, I made the frosting too soft this time. This is an approximation of what I do for cream cheese frostings:
5 T. butter at room temperature
2 8 oz. packages of cream cheese
2 t. vanilla
1 T. grated orange zest (optional)
2 to 3 cups powdered sugar (depending on desired consistency)
(If the frosting is too thick, sometimes I’ll add orange juice, one teaspoon at a time, as necessary)
Cream the butter on medium speed, scrape down the bowl, then add the rest of the ingredients and whip on medium until fluffy. This should be enough to frost more than 18 cupcakes generously.
I am probably one of the most unlikely people to ever start a blog. My exposure to posting anything on-line has been limited to writing on someone's wall on Facebook, which I've only recently gotten used to, and rarely do I read other people's blogs. But I've always loved writing, and once contemplated writing a novel, only to find that my lack of creativity was an insurmountable roadblock. But there is one thing I can probably write about: food, mainly baked goods and making them.
My foray into baking as a pastime really began only about two years ago (I'm not counting making cake from a box mix), when a good friend gave me a cookbook--a cupcake cookbook--for my birthday. Most of my time spent in the kitchen had been to fry eggs for dinner (!) or to heat up leftovers in a microwave. I might try making a dish or dessert here and there, but I never fully appreciated the comfort that creating a pastry has to offer. That was until I tried making my first cupcake. I have to admit, I only first became a fan of cupcakes because, well, they were popular in New York City—and if you know me, I love all things New York. On a trip to New York City, I tried a cupcake from a famous bakery which I will refrain from naming, and was just a little disappointed and disenchanted. They were good but not great. Maybe I had high expectations, and I wanted to love cupcakes. As the cupcake fever finally began hitting the West Coast, some of my friends made them for my birthday--a really nice treat! I thought I'd try my own hand at making them, especially since I now had this cookbook, and following my first attempt, I became a true believer—not in cupcakes alone, but the thought that maybe I could really do this. It was rewarding to be able to create something that others could enjoy, almost therapeutic, and it didn’t hurt that cupcakes were so cute. Ever since, I've been baking (not always cupcakes) for fun and for friends.
As you can tell, I’m hardly a seasoned professional or even an experienced homemaker, but I love to experiment and hope you’ll come with me for the ride as I try out new things.
My first cupcake recipe was the chocolate cupcake from Dede Wilson's A Bakers’ Field Guide to Cupcakes. I made them for an Easter brunch, and they turned out to be such a crowd-pleaser (I was pretty proud of myself, too), I've been asked to make these again for birthdays and showers. I believe what made them so good had much to do with the type of cocoa I used. I bought a canister of Italian cocoa from Williams Sonoma on a whim, and the cupcakes had a very rich, deep, unique—almost sharp, chocolate flavor. Sadly, I think Williams Sonoma no longer carries it (I went there today to check again, but it was nowhere to be found). I have used Droste, which you can find at Whole Foods and some supermarkets—the results were still very good, but just not the same.
Here is my adaptation of the recipe that started it all:
 Chocolate Cupcakes
Makes about 18 regular-sized cupcakes
- 1/2 cup unsalted butter, softened (butter should be a little cold and slightly firm, but not soft like a spread)
- 1 1/4 cups sugar
- 2 large eggs, at room temperature
- 1 t. vanilla extract
- 1 1/2 cups all purpose flour
- 1/2 cup good quality Dutch-processed cocoa powder
- 1 t. baking soda- 1 cup 2% lowfat milk, at room temperature (using lower fat milk—but not nonfat—produces results almost indistinguishable from full-fat milk)
Preheat the oven to 350F degrees, and line cupcake pans with cupcake liners.
1. Mix together the dry ingredients except sugar (i.e. flour, cocoa, baking soda) with a whisk in a bowl.
2. Cream the butter in a mixing bowl using an electric mixer on medium speed for a couple of minutes. Scrape down the sides of the bowl, add sugar, and cream the sugar and butter until "fluffy" (the butter should look a little more voluminous). Beating the butter on high may make the butter too soft, which renders it unable to incorporate enough air. I check on readiness based on visual cues, but this step usually takes another few minutes.
3. Beat one egg in at a time on low until just combined, scraping down the bowl after each egg. Add the vanilla extract.
4. Beat in the flour mixture and milk on low, alternating between the flour mixture and milk, but always starting and ending with the dry ingredients. Mix until just combined each time the flour mixture or milk is added and try not to over beat (over beating the batter results in a dense texture), and scrape down the sides along the way.
5. Fill the cupcake pan with the finished batter; each well should be about 3/4 full. (I used to use a regular spoon to do this, but discovered that an ice cream scoop really sped things up.)
6. Bake on the middle rack of the oven for about 20-25 minutes. They're done when the cake has risen into a slight dome, and an inserted toothpick comes out mostly clean with slightly moist crumbs. Remove cupcake pans from the oven to cool on cooling racks. Wait until the cupcakes have cooled a little before taking them out of the pan so you don't burn your fingers (I can be kind of overeager and forget to wait for the cupcakes to cool a little!).
Cupcakes should be frosted after they’ve completely cooled—melted frosting on a cupcake is a little messy and unsightly. My favorite frosting on these is a chocolate ganache, which adds the right amount of richness. I like to keep things simple, so to make the ganache, I use the following:
Chocolate Ganache
- 3/4 of a 12 oz. bag of semi-sweet chocolate chips (Trader Joe's chocolate chips are a great economical option)
- 1/2 cup heavy cream (you can vary this depending on the consistency you desire)
1. Pour chocolate chips into a heatproof bowl.
2. Heat the heavy cream in small pot until boiling.
3. Upon reaching boiling, pour the heavy cream over the chocolate chips and stir until the chocolate is melted.
4. At this point, you can take a cupcake and turn it upside down to dip the top into the ganache. I've also spooned the ganache on to the cupcake and used the back of the spoon to spread the dollop of ganache over the cupcake top. Once the ganache cools, I pipe a little pink-tinted whipped cream on top just for fun.


